When problem arise, you can enable logging and troubleshoot. Furthermore, resetting the hub is also an option. See below instructions.
Logging
The logging option can be found in the ezeep Hub’s web console under the menu item System:

| Menu | Function |
| Log level→ Errors and print job information (default) | only errors and information about executed print jobs will be logged (default setting) |
| Log level→ Errors only | |
| Log level→ All details | All details will be logged; this results in the largest volume of data. |
| Syslog server | Logs can be sent to a remote syslog server using TCP or UDP. Example (for Kiwi Syslog Server): tcp://192.168.149.222:1468 To disable syslog forwarding, leave this field empty. |
| Show Logs | shows the messages stored locally in the hub, with date and time |
| Download Logs | writes all messages stored locally in the hub to a .log file |
| Delete All Logs | • manually delete all messages stored locally in the hub • takes place automatically when the system is rebooted or after three days |
| Save | saves the settings |
| Cancel | cancels the operation |
More Detailed logging
- Connect a completely empty, FAT-32-formatted USB stick to the Hub.
- Perform a hardware reset (pull the power plug and then plug it in again).
- To read out the log simply unplug the USB stick during operation and then plug it into your workstation to copy the log file.
Factory Reset
In case you can’t reach a Hub via its web console or Powershell, there are two ways to perform a factory reset using a USB stick.
- Resetting the configuration to default values (recommended)
- Resetting the factory firmware version
1. Resetting the configuration to default values. If you want to keep the firmware version but to reset the configuration of a Hub – for example to reset the IP settings to DHCP – boot the Hub using an empty USB stick with only one file on it. Proceed as follows:
- Format a USB stick in FAT-32 format
- Copy the text file .factory_reset (attached below)
- Plug the USB stick into the powerless Hub, and then connect the Hub to the power supply.
- After approximately ten seconds, the red LED is lit continuously, while the green LED flashes rapidly for approx. 10 seconds.
- Remove the USB stick.
- Use the ThinPrint Hub Finder to determine the address of the Hub and then reconfigure the Hub by logging into the web console. See: Finding the ezeep Hub in the network
2. Resetting the firmware version
- Proceed as for resetting the configuration (see above). Note the following differences:
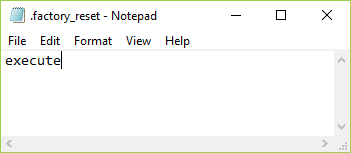
- The .factory_reset file contains the word execute. Download the attachment below, then edit it with notepad to include only the word execute. Then save the change and copy the file to the USB Stick.

- After approximately ten seconds, the red LED is lit continuously, while the green LED flashes twice in quick succession for a few minutes with a short pause in between (letter i of the Morse alphabet). The firmware will be reset to version 1.4.21, which takes a number of minutes.
Do not interrupt this (copy) process!
- Remove the USB stick.
- Use the Finder to determine the address of the Hub and update to the desired firmware version before reconfiguring it.
Troubleshooting
| Issue | Proposal for solution |
| The Finder can’t find the ezeep Hub anymore after moving it to another network. | • Using the web console, enter a valid gateway in IPv4 Settings. • In the Hub Finder, specify the subnet to be searched. |
| The Hub Finder finds the ezeep Hub, but its IP address belongs to another subnet. | The Hub may have been previously configured in another subnet, and its IPv4 network settings is set to Manual configuration. → Use the Finder to change the IP address of the Hub in question. |
| The Hub’s IP address belongs to another subnet, and the Hub Finder does not display it. | The Hub may have been previously configured in another subnet, and its IPv4 network settings is set to Manual configuration. → Alternative 1: • Proceed as described in the section Resetting the Hub settings to default values (factory reset). → Alternative 2: • Start a virtual machine on the physical network where the Hub is located, and then set a manual IPv4 address from the Hub’s network in that virtual machine. • Open a browser in the virtual machine, connect to the Hub, and change its IPv4 network setting to DHCP. • Use the Hub Finder to find out the Hub’s new, DHCP-assigned IP address. |
| ezeep Hub disappears from the Hub Finder five minutes after its system start. | • With enabling Make ezeep Hub invisible for the Hub Finder the ezeep Hub won’t be shown in the Finder anymore. |
| Hub Finder shows ezeep Hub as Read Only five minutes after its system start. | • Read Only becomes active with changing either the password the first time or the option Make ezeepHub invisible for the ThinPrint Hub Finder. |
| The ezeep Hub gets its old IP address (per DHCP) after a reboot even though it has been changed using the Finder beforehand. | • Changing the Hub’s IPv4 address using the Finder doesn’t affect the DHCP setting. This must be changed using the web console to Manual configuration afterwards, if necessary. |
| An uploaded certificate doesn’t work with the web console. | • Check whether the certificate name matches the address of the ezeep Hub. • Check whether the certificate was issued for server authentication. • Check the Hub’s System Time. |
